BRAINSTORMING I: Discovery Stage Brainstorming Exercise
Location: To be determined by the student
Duration: 1 hour, to be repeated as necessary
Materials: Sticky notes, pens, camera, image editing software
Description: An early stage activity that can help identify project ideas, methods, and potential paths for prototyping.
The goal of this exercise is to provide a structured activity to assist in the early stages of idea development. This is not the only approach a person can take when starting a project, but is one of many possible techniques.
Outline:
I: Brain Dump (10-15 minutes)
II: Organize and Identify (20 – 30 minutes)
III: Document and Annotate (10-15 minutes)
Step I: Brain Dump
Take a stack of sticky notes and a pen. Set the timer. (Give yourself a short but reasonable amount of time to work.) Put everything that comes to mind on a sticky note and place the note in front of you. Don’t be stingy with the stickies. Use one note per idea, thought or phrase. DO NOT EDIT your ideas, however, crazy or useless they may seem at this stage. Respect every initial idea that passes through your head. You can selectively choose what to focus on later.
Step II: Organize and Identify
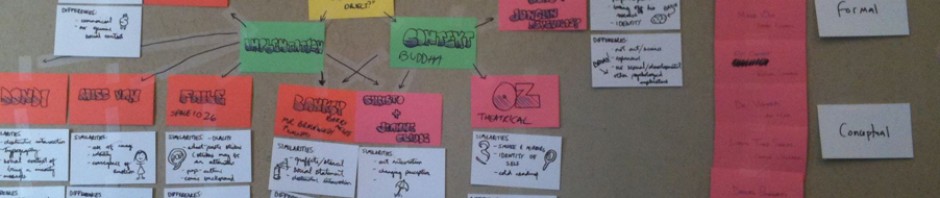
Start to group your sticky notes into categories. Avoid lumping everything together into a uniform square. Physically move the stickies that go together next to each other and pay attention to both how they conceptually and physically relate. Some notes will correspond to project ideas. Others will focus on topics and questions. Still yet, other notes will speak to a particular technology or media form. If you find stickies that have a shared relationship to other notes, place them in between and take note. If you find your stickies lack specificity, then you need to go back to Step I and generate more stickies in greater detail. If you are having trouble organizing your sticky notes, grab a friend or a fresh set of eyes and have them help you out.
You should start to see patterns between project ideas, methodologies, and technologies or forms. This can serve as the start of initial prototypes you may undertake to learn more about your possible projects, giving further insight as to which project to pursue (if you are deciding between ideas) or next steps if you already have something defined.
Step III: Document and Annotate
Take a photo of what you’ve done. Multiple photos, if needed. Then annotate your thoughts onto those photos using image software. Save these images as part of your archive.
Repeat Steps 1-3 if necessary.
 
Visionary Scenario
Location: To be decided by the student
Duration: Variable
Materials: Sticky Notes, paper, pen, mixed media
Description: Create a scenario that visualizes a proposed user experience.
Scenarios are design artifacts that can be generated at different times during the design process. In some cases scenarios explain a use case of an already created interactive project. In others (such as this one) scenarios can be used to clarify and visualize early stage ideas. This scenario will be used as a prototype, and communicative artifact that will serve the following functions:
To bridge the gap between internal vision and the external world, concretizing one’s ideas into experiential form.
To communicate your ideas in order to gain feedback and input from your peers/audience.
Keep in mind that a user’s experience starts before the user encounters your project, and ends after the user walks away. It is important to think about how your imagined audience finds your work and how they are affected by what they experience.
Outline:
I: Key frames
II: Blocking out a sequence.
III: Refining and preparation for presentation.
IV: Documentation.
Step I: Key Frames
Using the sticky notes write or sketch the main steps of the interaction you had in mind. Use one sticky note per action. These are the main anchoring events of your proposed experience. You may find you will need to shuffle or edit your key frames in order to capture the main events of the interaction you are proposing. This constitutes the key frames of your scenario.
Step II: Blocking out a sequence
You may find you have too little or too much information. You want to strike a balance between providing key steps that are necessary to communicate the experience vs. bogging down the audience with too much detail. You may find you have to experiment with adding and subtracting additional sticky note frames in order to work out the sequence that works best. In some cases you may not know what you want to have happen at a certain point. Experiment with different possibilities by re-arranging your sticky notes. Use physical groupings to help you spatially organize your ideas.
Step III: Refining and preparation for presentation.
When you are happy with what you have consider what media you want to present your scenario in. You are welcome to use any combination of media, but your scenario should communicate visually. Use your sticky note key frames and sequence as an outline.
Step IV: Documentation
Take photos of your work! Upload to your website.